
Episode 11

EPISODE 11-- How to get kids to do the talking!
LISTEN ON ITUNES
Today we are giving you strategies to help your kids take the lead when it comes to talking in the classroom. It can be so easy to take over the conversation without even realizing you’re doing it! As teachers, we know it’s important to get the kids talking but it’s not always easy to do when they are 4 and 5...
AND, We all know, when those observers come in... they want to see the kids talking…so we are giving you 3 different strategies to help you pass the very important role of talking onto your students.
Ok, I’m excited about this episode for several reasons… as I was coming up with ideas to share with you for this episode, I kept getting stuck because I thought, “shoot, they won’t understand this if they can’t see what I’m talking about”... so I have come up with a fun solution for that problem… some of the things we are going to talk to you about will be much more clear when you have a photo image in front of you… so I found a way to make that happen and you will get to actually see what we are talking about as you listen… this is going to be fun… So COOL !!!
It can be tough to get your students talking because they are so young, and they have a limited vocabulary just because they’re all really language learners at this age… and, as we know, you might have some bilingual students in there, some nonverbal students…
Yup, there’s just a lot of variables that can come into play in an early childhood classroom -- but the ideas we are going to talk to you about today are ideas that will work for you no matter what kind of mix of students you’ve got in your class…
So, the first strategy to get your students talking is an interviewing activity that we did every single day to help our kids' vocabulary to grow throughout the year… it was an activity we did right away in the morning, first thing after breakfast, once we all got to the carpet… and it was something they really looked forward to each day. It had a very simple structure that we practiced with the kids and very quickly they get it down, and become very independent in the core elements of the interviewing so that you can slowly increase the difficulty of the vocabulary you’re presenting them with, while keeping everything else the same… so they are ready to soak in the new words because they already have the steps of the routine down…
It seems so hard to get the kids to use the new vocabulary for each lesson that you’re doing because you introduce it to them and it’s so new to them... and then by the time that you’ve used the vocabulary enough for them to start to being able to use the words, boom - it’s time to move onto the next thing and teach them the next round of new words and start all over again...
Yes, so it was this interviewing part of our routine that allowed us to keep building and building on the same base… instead of building separate little towers of language for each new content bunch, you know, starting from scratch each time to build a small building of language -- you know, this one is weather words, and this one is community helpers… instead, with this strategy, you start building a tower, and you don’t change course, you keep building one big tower that just keeps getting bigger and stronger, and more impressive to stand back and watch…
So, what you’ll see with this activity is that we kept it really simple, so the kids can quickly take ownership of the steps… and before you know it, the kids have taken the lead...and they would do all of the talking in this beginning of the morning activity.. And that’s what we started every day with…
So, here’s how it goes- you have a student of the day, each day… and there’s a slide that I created that I would project up onto the screen to guide this activity… it will definitely help if you can see the slide while we are talking about it so we’re going to try something here… we have found a new fun way for you to view photos that will clarify things we are talking about… all you have to do is text the word “slide” to 513-436-6609… again we will repeat that for you…

At the top, you will see squares with the kids pictures… so that the rotation for the student of the day would be very clear and the kids could see who it was today who would be tomorrow it would be in a few days and they could kind of keep track and it got to the point where they were so good at it, when I would greet them in the morning as they came in... they would say “I know who the student of the day is!” … because they had paid attention and figured out how to see who the student of the day would be tomorrow...and the next day… and the day after that...
And getting to be the student of the day was a huge deal for them...and you know, it made them feel so good, to get this special little treat every few weeks...if the child didn’t remember it was their day, you could remind them when you greet them in the morning and their face lights up, their parents would always feel the special moment too… it made everyone smile...and this was something they each got to experience every two or three weeks … because you’d just go through the rotation of the class… so that order of students at the top would stay the same and once you get to the end… you’d start again at the beginning… and each time, you’d add more to the bottom portion, because as they mastered the words, they were ready for more words, more complicated vocabulary…
So to start it out the student of the day would come stand at the front of the room, right by the big screen that was projecting the slide that students would look to to remember their questions…. so at the beginning of the year the slide for interviewing has 6 questions on it… as you can see from the photo…. Some examples are, “what is your favorite color?” and then there’s a little picture that shows different colors so that helps them to be prompted by the image so they can remember and it’s pretty fascinating how well they can remember the questions based on the little picture that I put next to the question…. so what is your favorite color? how old are you? Do you have any pets at home? What do you like to eat for dinner? do you have any brothers or sisters? And then overtime, you make the questions more advanced...I will change the question from brothers and sisters to, “Do you have any siblings?” and we will talk about what siblings means…
So all of this will go in three week cycles because that’s about how many kids you have so you’ll keep rotating through... so the first round your questions are very simple and they’re getting introduced to it -- so you’re telling them what the questions are and there’s just a few of them -- one being, “how old are you?” Or they can ask “when is your birthday?” and I put a picture of a birthday cake with birthday candles... and that’s a good question for them to all know the answer to, you know, that’s a good question for them to be able to answer, so it’s good to work on it...in the beginning, they can’t answer that one yet, usually, most of them can’t, some can, but I have a birthday chart right next to our morning meeting spot so if this question is asked I look at it and I say “your birthday is May 13” and then they’ll say “my birthday is May 13.”
And then the questions will evolve as they master them… so you can add different questions - like, another question that goes along with the birthday candles is “what do you want for your birthday” they love to answer that one… and then, once they get the beginning questions down, another way to build on the interviewing skills is to teach them to ask “follow up” questions… so I will model how to ask them for more information… maybe they will say, “I want a bike for my birthday,” and I will ask them, “What kind of bike do you want?” or “what color do you want your bike to be?” and I will throw in there how we can model asking follow up questions, to get more information… or maybe they will answer the pet question, “do you have any pets at home?” and they will say “yes, I have a dog.” and I will raise my hand and ask, “What is your dog’s name?” or “what does your dog look like?” and then they will catch onto that and they will start asking those kinds of follow up questions too…
.. so that first three week cycle we are going through each of the kids for the first time you’re repeating the questions each morning and they’re pretty quick to pick up on them and they start to raise their hand and ask the questions to the student of the day on their own and you’re using a sentence structure that is the full question when is your birthday and then the answer with a full sentence my birthday is…
So now you’re adding more difficult questions and you can also throw in questions based on things that you’re studying like we do an animal study unit for like the whole second half of the year and I would put questions up there where kids could answer what is your favorite animal that we’re studying about or which animal do you like better?
So they get really good at this really quickly because the structure is so simple so they learn how to ask the questions based on the little pictures that I see in the prompts and then the kids are answering and then at the end of the interview we say thank you and clap and the kids are so happy to be interviewed and they’re learning more about their peers which is also important.
And then after the second or third round of it when the kids are really good at it’s asking the questions that they have up on the screen I’ll start to ask some random questions and it’s funny because the kids will remember the questions that you ask them and you can just start throwing in all different types of questions and the kids sort of pick up on the questions you’re adding and they will repeat those...and then they start to kind of come up with their own questions and we talk about the different kinds of questions that you can ask and what kind of things you can talk to people about…
Another reason I love this activity it was the way that we started our morning so after breakfast the kids come over to the carpet and this is the activity that we would do and it’s at that time of the day it always seems like there’s something to do, whether you’re collecting picture day money, making sure lunches get put on the shelf, helping kids take off their coats or switch their shoes... or maybe there’s parents that need to talk to you -- there’s always a lot going on in those first few minutes of the day, so the fact that your kids can start running the morning meeting with this activity is so helpful!
And like what’s so great about this interviewing activity in the morning is because is that you will watch the kids take ownership of it and become so independent with it I never did the calendar in the morning I know this is kind of controversial but some teachers do it and some teachers don’t but I didn’t continue doing it after you know my first year of teaching because I realized the kids are not picking up on this like we were going over the same things over and over and over and it just seemed like a concept that they did not understand until the end of the year so rather than doing that every single day I decided to do something that was different.
And I’m not completely knocking the calendar time I know that there are a lot of teachers that have found developmentally appropriate activities to do with the calendar like counting forward number recognition and it’s it’s good for things like that but I just found like I would keep saying OK what day is it today and maybe they would get it but they couldn’t really tell me what date was the next day and we would sing the days of the week song every day and it just seemed like it was not developmentally appropriate for them until the end of the year so I would rather just start introducing the days of the week and talking about that whole concept closer to the end of the year where it’s just starts to click and you don’t waste as much time doing it over and over and over every single day
Ok, so that’s a wrap on the interviewing… here’s a quick word from our sponsor before we get into the next strategy you can use to get your kids to do the talking....
Animal study
OK so now that’s something that can go into your daily routine 10 or 15 minutes a day you build on each student's knowledge of each other and they’re questioning skills and thinking skills and they’re listening skills and their vocabulary skills so it’s a great activity to incorporate into your day...
So the other vocabulary building secret that I’m going to tell you about is a lesson that I created and it’s an animal study essentially and you don’t have to use my exact document for this it’s something that’s in my TPT store but you could do it on your own but I chose animals because kids are so receptive and interested in animals and we used to do a zoo field trip at the end of the year so it’s kind of building up to that too
So essentially here is how the lesson we go I would introduce the animal to them and I would have a slide created that had all of these facts about each animal and they would have huge vocabulary words mixed in there very impressive vocabulary words and so the first day of each so this is an activity that we would do for like the second half of the year and our end of our afternoons you know 30 or 45 minutes at the end of the day and it also incorporated our world studies and I’ll tell you how I did that in a minute but it would be the last 30 minutes of the day the second half of the year which is just where I fit in our schedule block but the first day of the week.
I would introduce the animal with the slide with all the big vocabulary words and I would read through it with them and I would sort of elaborate with my body or you know with pictures of each of the fax so that they could see and really help them remember what the words are that we’re saying …
So like for example we are going to show you one of the slides so you can get a better idea of what we’re talking about…

Zebras are one of the first animals we do… and you can see some of the facts we teach the kids… “zebras live in the grasslands… a group of zebras is called a herd…”
And then I created these posters where I wrote those facts out but I wrote them with big words like just pretty much the keywords like carnivore or herbivore and then I would have a picture of a mama zebra a daddy zebra and a baby zebra and I would just have the word on it so that they could see that F OK baby zebra starts with an f ….Oh yeah it’s a foal...and they would start to decode the posters... and look at the letters and remember the words based on the pictures and just they’re thinking skills here are unbelievable...
So then on each poster it would have where in the World do zebras live so they were Able to say “zebras live in the grasslands of Africa.”

You are going to see what we created from that original fact sheet…. So we create a big poster for each of the animals...you are going to be looking at the one I’ve created for the zebras.
If you are in the Pre-K Teacher Family, you have access to EVERYTHING i’ve ever created for the animal studies that we do… we will go more into detail about everything you get in a minute, but i want to go through this with you step by step to make sure you’re getting a clear picture here… so you are seeing the poster i’ve created with the zebra fact sheet… if you are in the pre-k teacher family, you have a word document that you can print with the photos you see on this poster so that you can make your own posters… for each animal (The TPT document doesn’t come with that part)
So you are seeing the zebra poster and you can see how I broke it up to have large key words and images to support the vocabulary…

And you are going to see a photo of the tiger poster… you can see I strategically used colors to make certain words stand out and I spaced it all out and drew in some little hints to help the kids remember the words… like by the word nocturnal, I drew a moon and stars...to remind them, tigers hunt at night… I also use numbers in the facts, such as tigers can jump 16 feet high… they see that 16 and they think about it, then they see the “j” in the word jump and they remember, oh YA, /j/ /j/
I would make these big posters to accompany each animal so it would be like a long 9 x 12 piece of construction paper usually two pieces vertical put together you know like a long scroll sort of a poster at the top it would say the animals name and then the whole thing would be filled with the facts that we know about them with basically just a key vocabulary sticking out those words I want them to remember because the posters are what we would use to recall the information about each animal
So the animal study was a week by week progression-- We would study one animal for a week and then move on to the next one and we would keep adding to it… and on the last day of each week, we would do a review game, and that’s where the language explosion happens...
Monday I would introduce the animal we would read through the little fact sheet that comes with a TPT document … so you’ll have all the facts and information that you need to create your own posters, and again if you join the pre-k teacher family, you will get my additional word document that has the pictures I used on my posters that are just ready to go for you to print…
So then on the second day we would do our fill-in-the-habitat activity… this is one of my favorite creations… and I came up with it because you know how when you try to tell kids to draw an animal they’re all just like “I can’t do it”... well the problem was -- I couldn’t draw animals either, so I couldn’t even teach them to draw the animals but what I did was I created a template where it has a little clipart version of the animal on a blank piece of paper --- so we would draw in the habitat where the animals live!!! Because kids can draw lines to make trees and grass...and kids can draw circles to make stones...and shapes to make clouds… and these are SUPER IMPORTANT skills...and the way you do this week by week progression and build on the skills you’ve practiced each week with different animals...becomes this process of GROWTH that is REMARKABLE...to watch each week as they get better at their habitats and their drawings become more detailed...and to see them remember more vocabulary and retain more information… it’s the most rewarding thing, for the kids and for the teachers!!

This shows the tiger habitat photos (top left) your students can get inspiration from when designing their own habitat. The rest are tiger habitats drawn by my students using the fill-in-the-habitat template
Click here to check out the TPT document!
So I would model it for them... for the tiger habitat ...we would talk about where they live what it looks like and we would look at the pictures up on the screen... that shows tigers in their habitat… in the photo you just received, you can see a small preview of what the picture looks like that your students can choose from to model their habitat after…
I like to have them pick ONE of the photos to try to make their drawing look like...we talk about how the habitat pictures are supposed to be real realistic looking they can’t just start drawing whatever they want -- this is a tricky skill…. And they have to get good at designing their habitat to like one of the photos, before they can have the freedom to create their own habitats… I give them a few photos to choose from (that comes in the TPT document) but it’s not just a free for all time… they can create their own habitats on their own during center time if they want and I’m usually a huge advocate for giving kids freedom in their drawings, etc… but for this activity, I have found it works best when the kids are creating their habitats after some kind of model and the pictures I project up on the screen are the easiest way to have nice crisp beautiful photos for the kids to recreate…. It’s super simple and it’s the same every week…. If you purchase the tpt document you’ll have all of these ready to go for your students too… and week after week you can watch their habitat creations grow and mature and they just love doing these...
I would also use special “habitat crayons” that I would set out in cups that we would use for our habitat drawings...so it’s all the neutral sort of nature colors, so there wouldn’t be bright pink and orange in their little cups,-- but they would have all different shades of green and blue … and we will talk about how you could make the grasses look more realistic by adding more than one color of green and sort of shading and we would add a lot of detail as we continue to do the habit of pictures overtime and they would get better at them so in the beginning the first ones are pretty simple but as they get better they they get so independent in this activity … as we go along, i even show them how to use a peeled crayon on the side to create shading… they love learning new techniques for drawing clouds and trees and how to make water look like water, I teach them the simple trick of drawing w’s in the water to signal that it’s water… they just eat that kind of stuff up…
And then we would end up keeping all of their habitat drawings and putting them together in a book--- with some mini versions of the posters that I created-- I would take a picture of them and shrink them down to be the size of an 8 x 12 8 1/2 x 11 so that they could go in their book and then the kids would have this book that they could take home at the end and their families will be blown away at all the things that they could tell them about each animal
Ok, so Monday’s we introduce the facts using the poster… tuesday we start our habitat drawings… wednesday we finish our habitat drawings and then thursday’s are when we make masks for the animals… THE KIDS GET SO EXCITED FOR THE MASKS!!!

Here are the elephant masks we made! This is something the kids look forward to and many of them even ask to make a second for their siblings! We have lots of templates for mask-making available in the Pre-K Teacher Family!
These are a few of the elephant masks that our kids made… they love making the masks and often ask to make a second for their friend or sibling… and it’s great fine motor practice, carefully coloring the whole thing gray in the case of the elephant… or for the other animals like the giraffe, the carefully color in the spots or for the zebra, they carefully color in each stripe black…

This is just a few of the other mask templates we have available for the members of the Pre-K Teacher Family — Join today by clicking here!
You can see a few of the masks there… but you will have access to 13 different ones when you join the pre- k teacher family… I would print them out on cardstock and cut them out, this was something my para could easily help me prep so each week I would have everything ready to go for our animal studies work for the whole week -- I’d have the habitat sheets printed, I’d have the masks printed on cardstock and my para would help my cut out the eyes and then we’d put them on popsicle sticks after the kids colored them… and then we just reused our materials for the review game, which I will get to in a second--- but those are prepared at the beginning and reused over and over and over! So the prep for this whole animal studies unit is minimal and can be done way ahead of time, you could even send the masks home with a parent volunteer that might want to help out.
So the review game is just you make one card for each animal and it’s a card that folds three ways so it basically opens up but there’s two flaps on the front that close over the front and then when you open those two flaps you see the picture of the animal OK very simple so you’re laying down the card of the zebra first and the kids would come up and they would pull the zebra card and then they would hold it close to their chest and then they would look at it and then they would put it down and they would think for a second about what they know about that animal and then they’re going to give a clue and the friends are going to guess what animal it is

This is what the cards look like for the REVIEW GAME! They are folded on both sides with a picture of the animal in the middle.
So this really kicks into gear once you have two or more animals so you have the zebra card and the draft card sitting there and it’s just a picture of the animal inside the car when they when they left it up and flip it open so they see it they think and then they’re going to put the card down I put it they put it down under the shoe and the rest of the kids as they’re looking at the card the other kids are looking away I teach them to look up at the posters and study because otherwise they’re trying to peek at that card so we practice when the kid comes up they take the card they slide up their chest and then they peek at it carefully with the flaps in on the side still blocking it and then they slide it back down and put it under the shoe and then they take a second to think what does this animal eat where does it live what what does it look like and then they’re going to give a clue this is an animal animal that lives in Africa.. and then the kids that think they know an animal that lives in Africa will raise their hand and then the person that has given the clue will call on them and say their name and then they’ll say is it a zebra and then the person with her say yes or no and if they say no then they give another clue so they’ll say no and they can give another clue or they can call another kid — in the beginning of the of the study you’ll keep it simple they’ll probably just called another kid because they’re getting the routine down but later on as they get really good at it you can have them give another clue especially at the more animals that you start to get in the mix the more they know about them so the more information I can share about each one for the clues…
And this game within a few weeks will turn into the most impressive thing that you’ll sit back and watch with your students I it’s it’s my most proudest teaching thing because kids would go home using these words and telling their families about what they’ve learned about the animals.
And they would come in each week what animal are we learning about now and they would see that new poster hanging up at the front and they were so excited about it and all levels of your students can do all parts of this study.
So the other way that I build vocabulary was with an animal study and this is pretty much my favorite teaching thing from the whole year like my favorite thing to teach kids that they retain and get excited about because it’s the first time that I would have parents dropping off their kids saying they were telling me all about the zebra last night and I found it right as I was introducing these animals with these big vocabulary words the kids would to go home and they were using the words.
And I would be able to post things in our weekly newsletter that said here’s our animal we’re learning about this week here are some facts you can ask your kids about you know and I would underline to the big key vocabulary words so the parents could question them at home and they would be so impressed with what their kids could tell them about the animals.
So then you’ll go on with the study each week and you’ll keep adding more animals to your get a stack of cards for your review game and the review game will really become the core of the vocabulary explosion like any time that someone was in my room to watch this game happen they their jaws would drop
Because we would set it up as a student run game they would run it all themselves I would sit right next to the person that was giving the clue but for the most part they do it all and they are so proud to say the different vocabulary words and to get to call on their friends and get to take turns and then you can do so many different things with it we can break the kids up into smaller groups and they would have a few cards together to practice so you put three or four kids together and they have two or three animals and they could practice the game practice the skills and the steps of the asking and answering process and then they would get to practice using all the different facts and the posters are hanging up where they can see them so they can look up and they can remember different things about the animals in the beginning you’ll see that they’re all saying the same facts over and over but here’s what you need to do when you can get one or two kids to start using different things they know about the animal then you make a really big deal about that new fact that they shared and then as you’re reviewing your animals you can say oh this is a fact that we haven’t shared about polar bears how they have 42 teeth that would be a good one to use and you just sort of point out a few facts to them and they’ll each kid will kind of stick onto different ones and then they’ll end up using them later.
And then I would take the same picture of my posters that I took and put in their books later I sort of shrink down the poster on to just a normal piece of paper and I would put print those and I will put them in color up clear protectors so that and I’ll put them on clipboards so that the kids could interview each other and ask their peers questions about each animal and it was just another way of them to sort of doing interviewing situation with new vocabulary words and you were just hear the bees huge vocabulary words flying around the room when they’re interviewing with these little clipboards and it’s such a fun way to practice those facts.

And then I would leave those clipboards sitting at the front of the room so that if we had a break in time throughout the day were kids were done with something before the kids were all done I could say grab a clipboard and you can go run and do some interviewing by just grabbing a clipboard and going up to some of the other kids that are done and asking them facts
So just keeping those accessible Made it easy for kids to have fun interviewing their friends and practicing the vocabulary throughout the day
And that Leads me into one other activity that you can use throughout anytime of the day whenever you have time for your students to build vocabulary and practice talking with each other….

And this is another form of interviewing but it’s in a different way so I would have clipboards hanging on the back of the shelf near where we would eat breakfast and whenever kids would say I’m done eating breakfast you know how the transition to the carpet could be kind of slow because some kids are done right away some kids take 20 minutes well whenever kids are done with breakfast I wouldn’t I wouldn’t want them to go to the carpet first until more of them were done so the first kids ever done outside OK you can interview…
And they knew that that meant grab a clipboard and go around in and talk to the kids that are still eating and interview them with our interview boards which is just a sheet printed that goes inside of a sheet protector and then they use a dryer race marker in the clipboard and that they are different sheets that they would use to interview their friends some of them would say how are you feeling today so they will go around their friends and ask them how are you feeling today and it will be a picture of different faces feeling different ways and they would circle the answer that the peer says.
Another one says what is your favorite color and on the paper there’s just a color swatches of all different kinds of shades of colors and the kids would say my favorite color is orange and they would circle it like they’re sort of taking note of their answer.
And then you could also throw in the animal interviewing at this time if if that was something you were studying or you can throw in a few other ones that I’ve created that I can put on my website for you.
And it’s just a really great skill for the kids to be able to independently go around and talk to their friends in the morning and ask them different questions and then listen to their response and then make a note based on what they say…
And you can do so many different sheets of my favorite animal is or my favorite holiday is or do you know my favorite cartoon is which is different visuals and it’s just about the kids talking and listening and you know having those meaningful interactions in the morning And doing it independent.
When you join the pre-k teacher family, there are also “how to draw” drawing supports for all the animals...because I am a terrible artist, and I was terrible at drawing, let alone, trying to teach my kids how to draw something...so I would use these simple step by step drawing guides and when you join the pre-K teacher family there are over 50 easy printable step-by-step drawing supports you can print and set out for your students so they can practice drawing all of the animals.
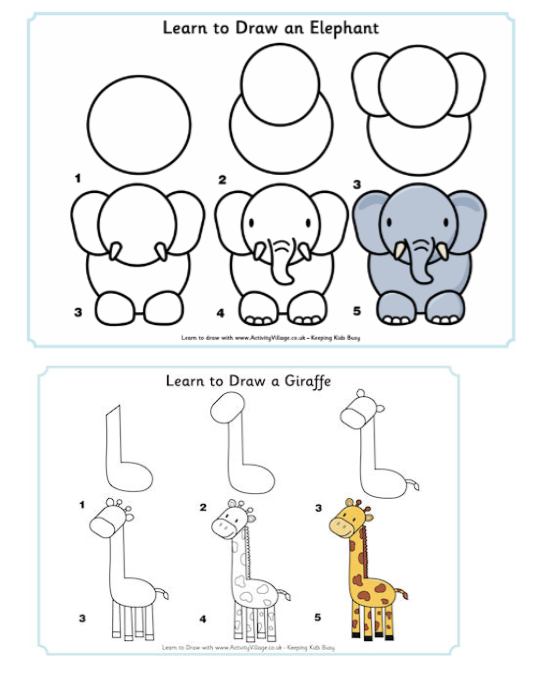
Here are 2 of the over 50 drawing support step-by-step guides you will have access to when you join the Pre-K Teacher Family. Click here to join today!
Ok, so that’s our episode for today, we hope you have found it helpful… as a reminder you can purchase the fill-in the habitat animal study on my TPT page and that includes the fact sheets, printable maps for them to find where the animal lives and color in that continent, as well as, the real photos of the animals and the fill in the habitat pages… , but if you want all the extras that we’ve been talking about in this episode -- the masks, the step by step how to draw guides, the clipart and pictures in a prepared document to make it easy for you to make the posters, and there’s also window tracing printables of all the animals that students love to add to their little animal books… and there’s smaller clipart pages of all the animals you can print for your students to make into books-- there’s just a TON of resources in the “Animal study” folder ready to go for the members of the pre-k teacher family… you can join by clicking on the link in the show notes or you can visit my website, triedandtrueteacher.com and click on the tab that says “join the pre-k teacher family” and remember to use the promocode PODCAST for 30% off your membership! Thanks for listening!